Article
Lesson content
Introduction
Every artwork starts with an idea.
The idea can be very small at first. It may be only a mood, a place, a character, a color, a memory, or a simple image in your mind.
For example:
A peaceful fantasy island.
That is enough to begin, but it is not yet a finished artwork.
To turn an idea into something ready for Skinbase, you need a simple creative workflow. You need to shape the idea, write a stronger prompt, generate several versions, choose the best result, check for problems, clean it up, prepare the image, add metadata, and upload it with care.
This workflow is important because AI-assisted artwork is not only about pressing a generate button.
The AI can help create the first visual result, but the creator still guides the direction and decides what is good enough to share.
A strong Skinbase creator asks:
-
What do I want to create?
-
What should the artwork feel like?
-
What style should it use?
-
What format do I need?
-
Which generated version is strongest?
-
What needs to be fixed?
-
Is the final image clean?
-
Does it have a good title, description, tags, and category?
-
Is it ready for the Skinbase community?
In this lesson, you will learn a simple step-by-step workflow that can help you move from idea to finished artwork.
The goal is simple:
Turn a creative idea into a polished AI-assisted artwork that feels intentional, clean, and ready to upload.
1. Start with a simple idea
You do not need a perfect idea at the beginning.
A simple idea is enough.
Examples:
A fantasy island.
A robot mascot.
A sci-fi city.
A peaceful forest.
A retro pixel-art beach.
A glowing tree.
A mountain lake at sunrise.
At this stage, the idea can be short. You are only choosing the direction.
The important question is:
What do I want to create?
Try to choose one main idea. If you add too many ideas too early, the artwork may become confusing.
Weak idea:
A forest, a city, a robot, a dragon, a spaceship, a beach, and a castle.
Better idea:
A peaceful fantasy forest with glowing flowers.
The better idea is more focused. It gives you a clear starting point.
A good rule:
Start simple, then add detail step by step.
2. Decide the purpose of the artwork
Before writing the full prompt, decide what the artwork is for.
This matters because different artwork types need different preparation.
Ask yourself:
-
Is this a desktop wallpaper?
-
Is this a mobile wallpaper?
-
Is this a cover image?
-
Is this an icon?
-
Is this a skin or interface concept?
-
Is this a character artwork?
-
Is this a fantasy world concept?
-
Is this a news or editorial image?
-
Is this an abstract background?
The purpose affects the format, crop, composition, and final quality check.
For example:
A desktop wallpaper usually needs a wide layout.
A mobile wallpaper needs a vertical layout.
A cover image needs space for text.
An icon needs a simple centered subject.
A skin concept needs clean and usable interface elements.
If your idea is:
A peaceful fantasy island.
You can prepare it in different ways.
Desktop wallpaper:
A peaceful fantasy island wallpaper, wide 16:9 desktop composition.
Mobile wallpaper:
A peaceful fantasy island, vertical mobile wallpaper composition, centered island, clean sky background.
Cover image:
A peaceful fantasy island cover image, wide banner composition with clean space for title text.
The subject is similar, but the final purpose changes the prompt.
A good rule:
Know the purpose before you generate.
3. Add subject details
Now you can expand the idea.
Start with your simple idea:
A peaceful fantasy island.
Then add important details:
A peaceful fantasy island floating above soft clouds, with waterfalls, ancient stone ruins, glowing flowers, and distant mountains.
The details should support the main idea.
Good details make the image richer. Bad details make the image confusing.
Good details:
-
waterfalls;
-
ancient ruins;
-
glowing flowers;
-
soft clouds;
-
distant mountains;
-
morning light.
These details all belong to a fantasy island scene.
Unfocused details:
-
robots;
-
cyberpunk cars;
-
dragons;
-
snowstorms;
-
neon billboards;
-
underwater cities.
These may be interesting, but together they may pull the prompt in too many directions.
Ask yourself:
-
Do these details belong together?
-
Do they support the main idea?
-
Do they make the scene clearer?
-
Are there too many details?
A good rule:
Add details that support the idea, not details that fight it.
4. Choose the style
Style tells the AI how the artwork should look.
The same idea can become many different kinds of artwork depending on style.
Your fantasy island could be:
detailed digital painting
cinematic fantasy concept art
retro pixel art
clean 3D render
minimal vector illustration
soft watercolor illustration
realistic landscape style
Choose one main style.
For example:
A peaceful fantasy island floating above soft clouds, waterfalls, ancient stone ruins, glowing flowers, distant mountains, detailed cinematic digital painting style.
This tells the AI that you want something polished, atmospheric, and painterly.
Avoid mixing too many styles.
Weak style direction:
realistic pixel art watercolor 3D anime oil painting
Better style direction:
detailed cinematic digital painting
Or:
retro pixel art with crisp dithering
A good rule:
One clear style is better than many conflicting styles.
5. Choose the mood
Mood tells the AI how the image should feel.
A fantasy island can feel peaceful, mysterious, dramatic, magical, dark, dreamy, or epic.
Examples:
Peaceful:
calm magical mood
Mysterious:
mysterious dreamlike mood
Epic:
epic cinematic mood
Dark:
dark fantasy atmosphere
Nostalgic:
nostalgic retro computer art mood
Mood helps guide the colors, lighting, and composition.
For our example, we can choose:
dreamy magical mood
Now the idea becomes:
A peaceful fantasy island floating above soft clouds, waterfalls, ancient stone ruins, glowing flowers, distant mountains, dreamy magical mood, detailed cinematic digital painting style.
A good rule:
Mood gives the artwork emotion.
6. Add lighting
Lighting can make the artwork much stronger.
It tells the AI how the scene is illuminated.
Examples:
-
soft morning light;
-
golden sunset light;
-
moonlight;
-
neon lighting;
-
dramatic rim light;
-
glowing magical light;
-
cloudy daylight;
-
volumetric light;
-
warm window light;
-
cold blue light.
For our fantasy island, soft morning light works well:
soft morning light
Now the prompt has a clearer atmosphere:
A peaceful fantasy island floating above soft clouds, waterfalls, ancient stone ruins, glowing flowers, distant mountains, dreamy magical mood, detailed cinematic digital painting style, soft morning light.
Lighting helps the image feel more intentional.
A good rule:
Lighting controls atmosphere.
7. Add composition and format
Composition describes how the image should be arranged.
Format describes the shape and use of the image.
For Skinbase artwork, this is very important.
Examples:
Desktop wallpaper:
wide 16:9 desktop wallpaper composition
Mobile wallpaper:
vertical mobile wallpaper composition
Cover image:
wide banner composition with clean space for title text
Icon:
centered subject, simple background, clean readable silhouette
For our example, we want a desktop wallpaper:
wide 16:9 desktop wallpaper composition
We can also add:
clean open sky area, balanced layout
Now the prompt becomes:
A peaceful fantasy island floating above soft clouds, waterfalls falling into the sky, ancient stone ruins, glowing flowers, distant mountains, dreamy magical mood, detailed cinematic digital painting style, soft morning light, wide 16:9 desktop wallpaper composition, clean open sky area, balanced layout.
A good rule:
Composition makes the artwork usable.
8. Add technical and negative notes
Technical notes help define quality.
Negative notes help avoid common problems.
Useful technical notes:
-
high-resolution;
-
clean details;
-
sharp focus;
-
wallpaper-ready;
-
polished final artwork.
Useful negative notes:
-
no text;
-
no watermark;
-
no logo;
-
no signature;
-
no blurry details;
-
no messy composition;
-
no low-resolution artifacts.
For our example:
high-resolution, no text, no watermark, no logo, no blurry details
Now we have a complete prompt:
A peaceful fantasy island floating above soft clouds, waterfalls falling into the sky, ancient stone ruins, glowing flowers, distant mountains, dreamy magical mood, detailed cinematic digital painting style, soft morning light, wide 16:9 desktop wallpaper composition, clean open sky area, balanced layout, high-resolution, no text, no watermark, no logo, no blurry details.
This prompt is much stronger than:
A fantasy island.
A good rule:
Tell the AI what you want and what you want to avoid.
9. Generate several versions
Do not stop at the first image.
Generate several versions from the same prompt. Each version may have different strengths.
One version may have better lighting.
Another may have stronger composition.
Another may have cleaner details.
Another may have a better mood.
Another may have fewer AI artifacts.
A good workflow is:
-
Generate 4 to 8 versions.
-
Save the strongest candidates.
-
Compare them side by side.
-
Choose the best foundation.
Do not choose only the most detailed image. Choose the image that works best overall.
Ask:
-
Is the subject clear?
-
Is the mood strong?
-
Is the composition good?
-
Does it work as a wallpaper?
-
Are there obvious mistakes?
-
Does it feel polished?
A good rule:
Generate many, but choose carefully.
10. Choose the best result
After generating several versions, select the strongest image.
The best image is not always perfect. It is the one with the best foundation.
Look for:
-
clear subject;
-
strong mood;
-
good lighting;
-
balanced composition;
-
clean details;
-
useful format;
-
few AI mistakes;
-
good upload potential.
Avoid choosing an image only because it has many details or dramatic effects.
A busy image can look impressive, but it may not work well as a wallpaper. A cleaner image may be more useful and more professional.
For example:
Version 1 may have beautiful colors but broken objects.
Version 2 may have strong mood but poor crop.
Version 3 may have clean composition and only one small artifact.
Version 4 may have too many random details.
Version 3 may be the best choice because it is easiest to finish.
A good rule:
Choose the version that needs the least repair and has the strongest feeling.
11. Check the image at full size
Before editing or uploading, open the image at full size.
Small previews can hide problems.
Check:
-
corners;
-
edges;
-
background;
-
main subject;
-
small objects;
-
text-like shapes;
-
watermarks or signatures;
-
blurry areas;
-
distorted objects;
-
faces and hands if people are present;
-
buildings and windows if architecture is present.
Common AI problems include:
-
fake text;
-
watermark-like marks;
-
strange shapes;
-
broken anatomy;
-
duplicated objects;
-
bad perspective;
-
messy details;
-
blurry areas;
-
low-resolution artifacts.
If the image has small problems, fix them.
If the image has many serious problems, generate again.
A good rule:
If you can see the problem, viewers may see it too.
12. Clean up and improve the artwork
Cleanup turns a generated image into a more polished AI-assisted artwork.
You can use tools like:
-
Photoshop;
-
GIMP;
-
Krita;
-
Affinity Photo;
-
Photopea;
-
built-in AI editing tools;
-
clone tools;
-
healing tools;
-
object removal tools.
Possible cleanup tasks:
-
remove fake text;
-
remove watermark-like marks;
-
remove unwanted objects;
-
repair small distorted areas;
-
improve crop;
-
adjust color;
-
adjust contrast;
-
sharpen important areas;
-
soften noisy backgrounds.
Do not over-edit.
Too much sharpening can make the image harsh.
Too much saturation can make colors look unnatural.
Too much contrast can destroy details.
A good rule:
Improve the image, but keep the mood natural.
13. Prepare the image for its final use
Now check whether the image works for its purpose.
If it is a desktop wallpaper:
-
is it wide enough?
-
does it have good resolution?
-
is the composition balanced?
-
is there enough calm space for icons?
-
are important details too close to the edges?
If it is a mobile wallpaper:
-
is it vertical?
-
is the subject centered or well placed?
-
will phone interface elements cover important details?
If it is a cover image:
-
is there enough space for text?
-
does it work as a banner?
-
is the focal point clear?
If it is an icon:
-
is the shape readable at small size?
-
is the background clean?
-
is the subject centered?
A good rule:
Beautiful is not enough. The image must work for its purpose.
14. Create the title
Now give the artwork a title.
The title should be clear, memorable, and connected to the artwork.
Weak title:
AI image 01
Better title:
Floating Island Morning
Weak title:
Fantasy
Better title:
The Island Above the Clouds
Weak title:
Wallpaper test
Better title:
Glowing Skyfall Island
A good title does not need to be long.
It should help people understand and remember the artwork.
For our example, a good title could be:
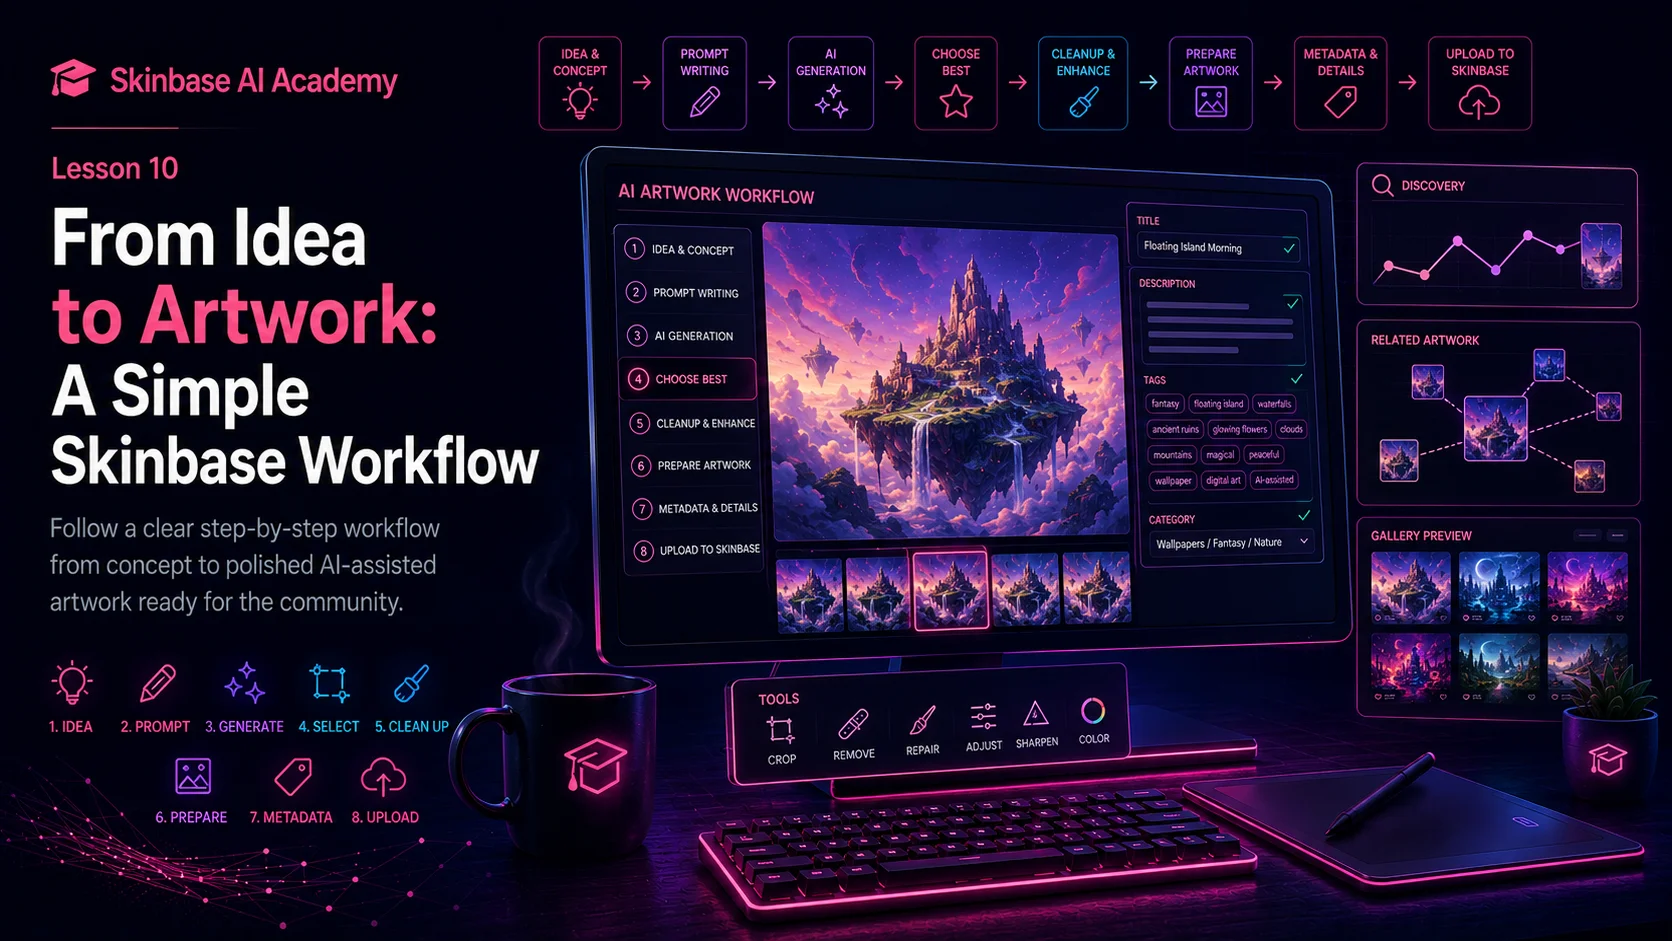
Floating Island Morning
A good rule:
Use the title for meaning, not keyword stuffing.
15. Write the description
The description gives viewers more context.
It can explain:
-
what the artwork shows;
-
the mood;
-
the style;
-
the final purpose;
-
whether AI was part of the workflow;
-
what was refined before upload.
Example description:
A peaceful fantasy island wallpaper with waterfalls, ancient ruins, glowing flowers, and soft morning clouds. Created with AI assistance, selected from several generations, and prepared for desktop wallpaper use.
This description is short, honest, and useful.
Avoid:
cool pic
Or:
fantasy wallpaper fantasy island best AI fantasy wallpaper download
A good rule:
Write for people first.
16. Add tags
Tags help people discover the artwork.
Good tags describe the subject, details, style, mood, format, and workflow.
For our example:
fantasy island, floating island, waterfalls, ancient ruins, glowing flowers, morning light, clouds, magical, peaceful, wallpaper, digital art, AI-assisted
This tag set is useful because it describes what the image shows and how it feels.
Avoid weak tags:
cool, nice, image, test, random
A good rule:
Tags should describe the artwork accurately.
17. Choose the category
The category tells Skinbase where the artwork belongs.
For our fantasy island example, a good category could be:
Wallpapers / Fantasy / Nature
A sci-fi city wallpaper may use:
Wallpapers / Sci-Fi / Digital Art
A robot mascot may use:
Characters / Sci-Fi / Digital Art
A retro pixel-art image may use:
Pixel Art / Retro / Wallpapers
Choose the category users would expect.
Do not choose a wrong category only to get more attention.
A good rule:
Use the category for the main type of artwork. Use tags for details.
18. Do the final upload check
Before publishing, check everything one more time.
Image check
-
Is the image clean?
-
Is the resolution good?
-
Is the crop correct?
-
Is the subject clear?
-
Is the mood strong?
-
Are there fake text, logos, signatures, or watermarks?
-
Are there obvious AI artifacts?
Purpose check
-
Does it work as a wallpaper, artwork, icon, cover, or skin concept?
-
Is the aspect ratio correct?
-
Is the composition useful?
-
Does it look good as a thumbnail?
Metadata check
-
Is the title useful?
-
Is the description clear?
-
Are the tags accurate?
-
Is the category correct?
-
Did you mention AI assistance if needed?
Final question:
Would I be proud to show this artwork?
If yes, it is ready for Skinbase.
19. Complete example workflow
Let’s turn one simple idea into a finished Skinbase upload.
Simple idea
A peaceful fantasy island.
Expanded idea
A peaceful fantasy island floating above soft clouds, with waterfalls, ancient ruins, glowing flowers, and distant mountains.
Final prompt
A peaceful fantasy island floating above soft clouds, waterfalls falling into the sky, ancient stone ruins, glowing flowers, distant mountains, dreamy magical mood, detailed cinematic digital painting style, soft morning light, wide 16:9 desktop wallpaper composition, clean open sky area, balanced layout, high-resolution, no text, no watermark, no logo, no blurry details.
Generation
Generate several versions and compare them.
Choose the version with the best composition, lighting, and clean details.
Cleanup
Remove small artifacts, adjust color and contrast, crop for 16:9 desktop use, and export a clean final file.
Metadata
Title:
Floating Island Morning
Description:
A peaceful fantasy island wallpaper with waterfalls, ancient ruins, glowing flowers, and soft morning clouds. Created with AI assistance, selected from several generations, and prepared for desktop wallpaper use.
Tags:
fantasy island, floating island, waterfalls, ancient ruins, glowing flowers, morning light, clouds, magical, peaceful, wallpaper, digital art, AI-assisted
Category:
Wallpapers / Fantasy / Nature
This is a complete workflow from idea to artwork.
20. Common beginner mistakes
Beginners often make these mistakes:
-
starting with too many ideas;
-
writing a vague prompt;
-
forgetting style, mood, lighting, or composition;
-
generating only one image;
-
uploading the first result;
-
not checking the image at full size;
-
leaving fake text or watermark-like marks;
-
using the wrong aspect ratio;
-
using a weak title;
-
writing no description;
-
using poor tags;
-
choosing the wrong category;
-
uploading before the artwork feels ready.
These mistakes are normal when you are learning.
The solution is simple: slow down and follow the workflow.
A good rule:
The workflow helps you create with more control.
Key takeaways
Every artwork starts with an idea.
A simple idea becomes stronger when you add details, style, mood, lighting, composition, and technical notes.
Generate several versions and choose the strongest one.
Check the image at full size before uploading.
Clean up artifacts, crop correctly, and prepare the image for its purpose.
A finished Skinbase upload needs a good title, description, tags, and category.
AI can help create the image, but the creator guides the process.
A strong workflow turns raw generation into polished AI-assisted artwork.
Practical exercise
Start with this simple idea:
A sci-fi city after rain.
Now turn it into a complete Skinbase workflow.
Step 1: Expand the idea
Add details:
A futuristic sci-fi city after rain, glowing neon towers, wet streets, reflections, distant flying vehicles, and a purple night sky.
Step 2: Add style, mood, lighting, and composition
Improved prompt:
A futuristic sci-fi city after rain, glowing neon towers, wet reflective streets, distant flying vehicles, purple night sky, cinematic sci-fi concept art style, mysterious futuristic mood, blue and pink neon lighting, wide 16:9 desktop wallpaper composition, high-resolution, no text, no watermark, no logo, no blurry details.
Step 3: Generate
Generate several versions and choose the strongest one.
Step 4: Check and clean
Look for fake signs, watermark-like marks, distorted buildings, blurry areas, and messy reflections.
Step 5: Prepare metadata
Possible title:
Neon After Rain
Possible description:
A cinematic sci-fi city wallpaper with glowing neon towers, wet reflective streets, and a mysterious purple night atmosphere. Created with AI assistance and prepared for desktop wallpaper use.
Possible tags:
sci-fi city, neon, rain, cyberpunk, futuristic, night city, reflections, wallpaper, digital art, AI-assisted, cinematic
Possible category:
Wallpapers / Sci-Fi / Digital Art
Step 6: Final check
Ask:
-
Is the image clean?
-
Does the mood match the idea?
-
Does it work as a wallpaper?
-
Are the title and tags useful?
-
Is the category correct?
-
Is it ready for Skinbase?
If yes, the artwork is ready to publish.
Final note
A simple workflow helps you create better artwork.
You do not need to be perfect. You only need to follow the steps with care.
Start with an idea.
Build a stronger prompt.
Generate several versions.
Choose the best result.
Clean and prepare the image.
Add useful metadata.
Upload only when it feels ready.
That is the Skinbase workflow.
A good AI-assisted artwork is not only generated.
It is guided, selected, refined, prepared, and shared with intention.
Course navigation